Showing posts with label japanese. Show all posts

25.7.11

8.7.11

been down so long...

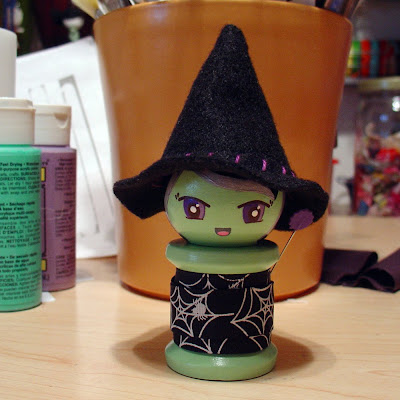
but still working! I just finished a new spool doll with new eyes, well, eyelashes. Star bursts! Pop! Pop!

27.5.10

animal bobbins.


You know, you gotta love Daiso! Since I've been on this bobbin kick lately, I've been keeping a keen eye out for other cool notions I can use instead. (I'm not really sure why there's such a shortage of cooler bobbins.) I found these cute animal cutouts at the local Daiso, which are originally intended as "planter accessory" to "decorate the planter fashionably." Soon as I saw them, I knew they would make perfect bobbins! I found only the sheep yesterday and I really wanted the dogs.... So today, I went back and got on all fours to scour the floor. They're packed in such small bags, I was certain a few had fallen and gotten tucked in the shadows. Sure enough, I found one bag, a bag of dogs! Needless to say, this little girlie had a very good day!

5.5.10

Girls just wanna have fun!!


I love, love the way Marleen has done up these gals! No doubt they're having a blast in Netherlands!

3.5.10

wishlist.

I want very very much this little cutie for my birthday. Alas, she's currently only available in Europe! Blast!

1.5.10

15.4.10

Bobbin gals.

After seeing a few clever and cute embroidery floss bobbins, I definitely wanted some of my own. Really, I just wanted to make them, but as most of these are laser cut wood, I thought initially I was doomed. Looked into laser cutting, and boy, it's expensive so I figured I'd cut out my shapes from a flat sheet of clay instead. I toyed with this for a bit, then pictured myself covered with a crumbly mess in desperation. I had to give it a rest.

Would you believe it? The sages are right again. Good things come to those who wait. (A pocket full of change, I mean large bills, of course would be nice.) After some time, the more usual dowel version of the bobbin came to mind, you know, the wooden stick with caps on both ends. Well, I proceeded to make these with 1" wooden balls at one end so I can paint them as doll heads. They took almost a day to finish but they're well worth the time! I just loOoOve them! They're perfect in my Japanese ribbon collection. Finally, I've made my very own bobbins!

5.10.09

Apple harvest.


Apple pincushions showcasing Japanese fabrics from my sister's trip.

14.9.09

Morgan.


Getting pretty good at making these. I made Morgan in a few hours last night. Not that I had to but I mixed her swampy green skin. I was playing with the small bottle of paint, when it occurred to me today that if you want to reproduce an item, you have to mix a lot of paint. Of course, it also brings up the subject of mixing paint vs. buying all ready tinted paint. Using paint straight out of their bottles ensures consistency but I think it's kinda fun mixing your own. I just love her skin!!!

10.9.09

wip.


Matryoshka needle cases.


Almond eyes.

1.9.09

evolution.

After practicing on over a dozen squinty eyed spool dolls, I finally acquired enough skills to move on to wide eyed dolls. Although it seems trivial, the number of white reflective dots in their eyes makes a difference in capturing expression. Actually the length of eyelids also matters. This first doll looks fierce and mean with the furrowed, almost mono-brow.

Softer with eyelids trimmed and more white dots, Dahlia now radiates with glee.

Safira and Dahlia, bright and wide eyed!

26.8.09

eggs?

As much as I aspire to become Martha Stewart-esque, I just don't have enough egg parties. I was looking for a place to set these dolls upside down while their bottoms dry, when I came upon this egg tray on my shelf. I've been trying to find a regular use for it so I can justify hoarding yet another item with a singular purpose. Definitely won't be chucking this any time soon.


Whipped up a couple origami purses yesterday. If you're into instant gratification, this is the project for you. They're super easy, quick and fun to make and I just love the simplicity of their shape.

21.8.09

Fabrics and ribbons!

My sister has returned from Japan, finally, I was getting a bit lost there without her (was missing her a lot). She brought home these fantastic fabrics and ribbons, which was really awesome of her to do considering her full and hectic schedule. She has over 900 pictures of places and things. Can't wait to get started on these! Yay!

8.8.09

how to pluck a kokeshi's eyebrows.

Here are some tricks to painting clean thin lines, especially for those delicate facial features on your small figurines.

Before painting on the bushy eyebrows below, I sealed the face with two coats of non-toxic varnish* and then lightly drew the features with a pencil.


With the paint dry and a damp pointed wooden tool (like a toothpick), carefully trim away rough edges of eyebrows. Keep scraping until you achieve the desired shape and use a damp cloth to wipe away smudges. You can use this subtractive technique for all the facial details. After completing the face, apply several more coats of varnish to seal your work but remember to erase first all your pencil marks. Viola! Now your gal's got the prettiest brows!

*Sealing the face with varnish makes the removal of paint possible since this prevents paint from seeping into the wood.

15.7.09

Nissa, Reidun, Winka - 2nd generation.


All decked out and Winka now with cool blue eyeshadow. In the past I've used wipe-on poly but these I sealed with water based varnish instead. It's definitely more user friendly, quick drying and forgiving, since it doesn't have the tacky quality common in oil based products. Unlike what I previously thought, it'll achieve an even coat even after several applications. It also helps to keep a wet edge, meaning don't go over what's just been painted, move forward so the work doesn't get streaky.