Showing posts with label wood. Show all posts

2.9.10

can't help it...

Perhaps you may be over bobbins but I'm certainly not. I've now found the perfect (no, this time they really are perfect) animals to hold my assortment of twine.

I saw this brilliant idea from Zakka Life way back and have never given up looking for just the right creatures. These doe and deer came from Jupiter's Child, another wonderful Etsian. Check out the shop and perhaps you too would like to adopt a few of their lovely pets. You'll find it hard to say no. I, of course, would still love a giraffe....

Forgot to mention that this obsession did have its reward. My very own bobbin gals made it in the July/August issue of the hip Australian frankie magazine! It was so cooool (still is) and tremendously gratifying. Thank you all who have supported and continue to support me.

My bobbin gals in frankie magazine!

27.7.10

jolly jars.

Coming soon!


And more goodness....

28.6.10

happy.


I go through staring contests with wooden pieces a lot. Sometimes I win. The mushroom caps were a wrong purchase almost doomed to the reject pile. Now I wish I had more of them. These turned out so cuuute!

5.5.10

Girls just wanna have fun!!


I love, love the way Marleen has done up these gals! No doubt they're having a blast in Netherlands!

15.4.10

Bobbin gals.

After seeing a few clever and cute embroidery floss bobbins, I definitely wanted some of my own. Really, I just wanted to make them, but as most of these are laser cut wood, I thought initially I was doomed. Looked into laser cutting, and boy, it's expensive so I figured I'd cut out my shapes from a flat sheet of clay instead. I toyed with this for a bit, then pictured myself covered with a crumbly mess in desperation. I had to give it a rest.

Would you believe it? The sages are right again. Good things come to those who wait. (A pocket full of change, I mean large bills, of course would be nice.) After some time, the more usual dowel version of the bobbin came to mind, you know, the wooden stick with caps on both ends. Well, I proceeded to make these with 1" wooden balls at one end so I can paint them as doll heads. They took almost a day to finish but they're well worth the time! I just loOoOve them! They're perfect in my Japanese ribbon collection. Finally, I've made my very own bobbins!

14.9.09

Morgan.


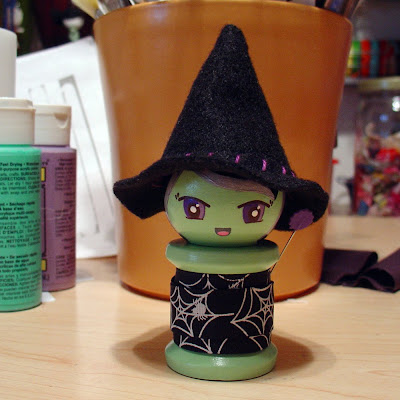
Getting pretty good at making these. I made Morgan in a few hours last night. Not that I had to but I mixed her swampy green skin. I was playing with the small bottle of paint, when it occurred to me today that if you want to reproduce an item, you have to mix a lot of paint. Of course, it also brings up the subject of mixing paint vs. buying all ready tinted paint. Using paint straight out of their bottles ensures consistency but I think it's kinda fun mixing your own. I just love her skin!!!

10.9.09

wip.


Matryoshka needle cases.


Almond eyes.

1.9.09

evolution.

After practicing on over a dozen squinty eyed spool dolls, I finally acquired enough skills to move on to wide eyed dolls. Although it seems trivial, the number of white reflective dots in their eyes makes a difference in capturing expression. Actually the length of eyelids also matters. This first doll looks fierce and mean with the furrowed, almost mono-brow.

Softer with eyelids trimmed and more white dots, Dahlia now radiates with glee.

Safira and Dahlia, bright and wide eyed!

8.8.09

how to pluck a kokeshi's eyebrows.

Here are some tricks to painting clean thin lines, especially for those delicate facial features on your small figurines.

Before painting on the bushy eyebrows below, I sealed the face with two coats of non-toxic varnish* and then lightly drew the features with a pencil.


With the paint dry and a damp pointed wooden tool (like a toothpick), carefully trim away rough edges of eyebrows. Keep scraping until you achieve the desired shape and use a damp cloth to wipe away smudges. You can use this subtractive technique for all the facial details. After completing the face, apply several more coats of varnish to seal your work but remember to erase first all your pencil marks. Viola! Now your gal's got the prettiest brows!

*Sealing the face with varnish makes the removal of paint possible since this prevents paint from seeping into the wood.

15.7.09

Nissa, Reidun, Winka - 2nd generation.


All decked out and Winka now with cool blue eyeshadow. In the past I've used wipe-on poly but these I sealed with water based varnish instead. It's definitely more user friendly, quick drying and forgiving, since it doesn't have the tacky quality common in oil based products. Unlike what I previously thought, it'll achieve an even coat even after several applications. It also helps to keep a wet edge, meaning don't go over what's just been painted, move forward so the work doesn't get streaky.

14.7.09

oh snap!


Heads are not secured yet with one coat of varnish. I painted the heads separately from the spools so the varnish doesn't pool around their necks. I also opted not to paint their bodies. I figured with the handling, it's better to leave these au natural. Plus, I kinda fancy the wood grain.

13.7.09

lollipops.


Thought I'd try my hands at painting kokeshis again. It's actually a lot easier to accomplish these fine lines with a soft, long liner brush than a short one. When working on small surfaces, I prefer the more intentional wrist rotation, which makes for steadier strokes. Since the longer brush has a greater span, it works best with this technique. With a short brush, the tendency is to move the hand with the application, which can cause work to get shifty.

25.6.09

Wooden Dolls.

I see so many wonderful creations everywhere, everyday, it's finally time to speak, rave about a few of them...well particularly wooden dolls.


These adorable, giggly girls are handmade by Fabi Sehnem of Joinville, Brazil. Don't you just wanna rub and pinch their cheeks... again... and again.


While these beautiful belles are crafted by Renata of Creating from the Heart. Just the right kind of girls you can bring home to mom, polite, pretty and polished.


Perhaps the best is this brilliant, ultra hip kokeshi couple concocted by talented artist, Pamela Jaeger of San Diego and since she's featured in a gallery just a stone's throw from my home, I've had the pleasure of viewing her dolls in person. The detail work (those big eyes) is fantastic, very impressive!

Enjoy.

8.6.09

Reidun, Winka, Nissa.


Sealed with a kiss - mwah!

7.6.09

plus 1.


Started the sealing process today. Applied wipe-on polyurethane instead. It's nearly impossible to avoid dust, lint, tiny hairs but ignoring these only ruins good work. Back to sanding...