

5.10.09

3.10.09


17.9.09


16.9.09


14.9.09
Morgan.
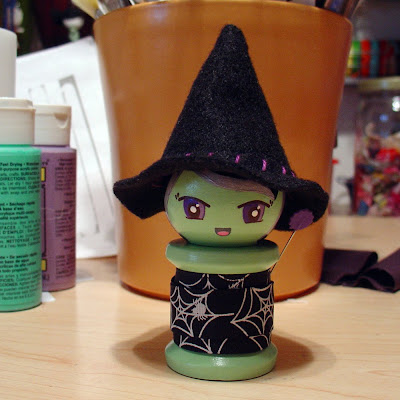
Getting pretty good at making these. I made Morgan in a few hours last night. Not that I had to but I mixed her swampy green skin. I was playing with the small bottle of paint, when it occurred to me today that if you want to reproduce an item, you have to mix a lot of paint. Of course, it also brings up the subject of mixing paint vs. buying all ready tinted paint. Using paint straight out of their bottles ensures consistency but I think it's kinda fun mixing your own. I just love her skin!!!

11.9.09

10.9.09


1.9.09
evolution.
After practicing on over a dozen squinty eyed spool dolls, I finally acquired enough skills to move on to wide eyed dolls. Although it seems trivial, the number of white reflective dots in their eyes makes a difference in capturing expression. Actually the length of eyelids also matters. This first doll looks fierce and mean with the furrowed, almost mono-brow.

Softer with eyelids trimmed and more white dots, Dahlia now radiates with glee.

Safira and Dahlia, bright and wide eyed!


Softer with eyelids trimmed and more white dots, Dahlia now radiates with glee.

Safira and Dahlia, bright and wide eyed!
26.8.09
eggs?
As much as I aspire to become Martha Stewart-esque, I just don't have enough egg parties. I was looking for a place to set these dolls upside down while their bottoms dry, when I came upon this egg tray on my shelf. I've been trying to find a regular use for it so I can justify hoarding yet another item with a singular purpose. Definitely won't be chucking this any time soon.

Whipped up a couple origami purses yesterday. If you're into instant gratification, this is the project for you. They're super easy, quick and fun to make and I just love the simplicity of their shape.

21.8.09
Fabrics and ribbons!
My sister has returned from Japan, finally, I was getting a bit lost there without her (was missing her a lot). She brought home these fantastic fabrics and ribbons, which was really awesome of her to do considering her full and hectic schedule. She has over 900 pictures of places and things. Can't wait to get started on these! Yay!

Griffin and Finch.

Thank you Sophia for making Griffin and Finch a part of your wonderful celebration and giving them a fine new home.
16.8.09
what a quack!
Finally got the Japanese book (ISBN483476348x) I've been coveting for 2 weeks from a local Mitsuwa. I really only wanted it for its duckie pattern.
I had to modify a bit the original pattern since the gargantuan head made him just a bit puffy and alien-y for me. I also had to soften its ridiculously angular wings and it looks like I might need to make smaller his feet just a tad. Overall I think the quack came out pretty darling.
I had to modify a bit the original pattern since the gargantuan head made him just a bit puffy and alien-y for me. I also had to soften its ridiculously angular wings and it looks like I might need to make smaller his feet just a tad. Overall I think the quack came out pretty darling.

14.8.09

10.8.09
drum roll please!
Thank you everyone for participating in the Handpicked Giveaway and for all the awesome and wonderful raves!!! Such compliments always inspire me to do more and better. Now I'm sure you're all very excited so without further ado, the winner is...

8.8.09
how to pluck a kokeshi's eyebrows.
Here are some tricks to painting clean thin lines, especially for those delicate facial features on your small figurines.
Before painting on the bushy eyebrows below, I sealed the face with two coats of non-toxic varnish* and then lightly drew the features with a pencil.

With the paint dry and a damp pointed wooden tool (like a toothpick), carefully trim away rough edges of eyebrows. Keep scraping until you achieve the desired shape and use a damp cloth to wipe away smudges. You can use this subtractive technique for all the facial details. After completing the face, apply several more coats of varnish to seal your work but remember to erase first all your pencil marks. Viola! Now your gal's got the prettiest brows!

*Sealing the face with varnish makes the removal of paint possible since this prevents paint from seeping into the wood.
4.8.09

30.7.09

28.7.09
Owl on a log.

Meet Carnation, the dreamy owl birdie. She enjoys red wine and sunsets and apples and cheese. She especially loves ball flowers, so she welcomes colorful pins aplenty in her log, creating a most wondrous garden for perching.
15.7.09
Nissa, Reidun, Winka - 2nd generation.

All decked out and Winka now with cool blue eyeshadow. In the past I've used wipe-on poly but these I sealed with water based varnish instead. It's definitely more user friendly, quick drying and forgiving, since it doesn't have the tacky quality common in oil based products. Unlike what I previously thought, it'll achieve an even coat even after several applications. It also helps to keep a wet edge, meaning don't go over what's just been painted, move forward so the work doesn't get streaky.
14.7.09
oh snap!

Heads are not secured yet with one coat of varnish. I painted the heads separately from the spools so the varnish doesn't pool around their necks. I also opted not to paint their bodies. I figured with the handling, it's better to leave these au natural. Plus, I kinda fancy the wood grain.
13.7.09
lollipops.

Thought I'd try my hands at painting kokeshis again. It's actually a lot easier to accomplish these fine lines with a soft, long liner brush than a short one. When working on small surfaces, I prefer the more intentional wrist rotation, which makes for steadier strokes. Since the longer brush has a greater span, it works best with this technique. With a short brush, the tendency is to move the hand with the application, which can cause work to get shifty.
10.7.09
eureka.
bvI have not been able to stop making these apples. I kept adjusting the pattern for a curvier, tapered body but I think I've finally come up with the perfect shape. This green apple has the narrower bottom I'm looking for.

More importantly, I have more exciting news. Tonight, as I was getting ready to secure the leaf and stem to this gorgeous fruit, I saw something else. A pear!!! Yup, a pear and the pear below is actually the apple, upside down, sans puckers! It's a simpler task since it won't require the tricky thread tugging necessary for an apple's puckers. With a pear, attaching stem and leaf finishes the job. One pattern for 2 different fruits - that is brilliant! (There's a very impressive lady who sells these patterns in a kit and I bet she offers a single pattern for both fruits.) Hmmm....

I certainly look forward to making lots of pears this weekend, but for now I desperately need to do some snoring ^_-. I do hope these tutorial and tips have been encouraging. Perhaps you too will discover something new - happy crafting!
9.7.09
handpicked giveaway.

To celebrate the Summer and as a token of my appreciation for the crafts community, I'm giving away an apple pincushion of your choice from this batch. To enter, please leave a comment. The winner will be randomly picked and announced on Aug10. Enjoy!!!
Don't forget to check out the tutorial.
7.7.09

apple pincushion tutorial.
I have been wanting to make my very own brightly colored fruity pincushions for some time but haven't because I didn't have a pattern. Although there are certainly enough patterns online and in stores available for these, I prefer developing my own patterns so I don't have to worry about being bound to certain limitations. It's far more rewarding and comforting knowing I'm working with templates of my own. In the end, I control the fates of my creations - keep, gift and yes even sell them.
The pictorial tutorial shows a quick way of creating your own pattern. You can also apply this method to other bulbous articles; yes, a pear, an egg (use a styrofoam/cardboard egg please and perhaps 4 parts, instead of 6, is best), a tomato. Whatever you choose, I'm sure you'll find this exercise quite encouraging and liberating. Have fun!!!

Add an additional 1/8" seam allowance to your fabrics when cutting. For the stem, cut 2 pieces of felt in 2 colors, 1" x 1.5", with the inner felt just slightly narrower and roll them, stitch closed. The leaf also uses 2 shades of felt, the underside being darker. Sew leaf to one end of rolled stem. Secure stem and leaf with fabric glue to apple; also attach a button on apple's bottom with fabric glue. With perle cotton and doll making needle, (or the longest needle you have) go through stem, apple and button at least 3 times. Pull taut to create puckers and knot.
2.7.09

25.6.09
Wooden Dolls.
I see so many wonderful creations everywhere, everyday, it's finally time to speak, rave about a few of them...well particularly wooden dolls.

These adorable, giggly girls are handmade by Fabi Sehnem of Joinville, Brazil. Don't you just wanna rub and pinch their cheeks... again... and again.

While these beautiful belles are crafted by Renata of Creating from the Heart. Just the right kind of girls you can bring home to mom, polite, pretty and polished.

Perhaps the best is this brilliant, ultra hip kokeshi couple concocted by talented artist, Pamela Jaeger of San Diego and since she's featured in a gallery just a stone's throw from my home, I've had the pleasure of viewing her dolls in person. The detail work (those big eyes) is fantastic, very impressive!
Enjoy.
Enjoy.

19.6.09
basket cake.


18.6.09

14.6.09

13.6.09

8.6.09

7.6.09
plus 1.

Started the sealing process today. Applied wipe-on polyurethane instead. It's nearly impossible to avoid dust, lint, tiny hairs but ignoring these only ruins good work. Back to sanding...
4.6.09
Girls.

It's truly best to wait a few days for the paint to cure as most of the brush streaks flatten with time. It also helps to sand each doll entirely with a clean brown paper bag. As far as the sealer, I'm still doing tests to find the best way to apply varnish.
Subscribe to:
Comments (Atom)


