

Showing posts with label pins. Show all posts
Showing posts with label pins. Show all posts
9.2.10
5.10.09

14.9.09
Morgan.
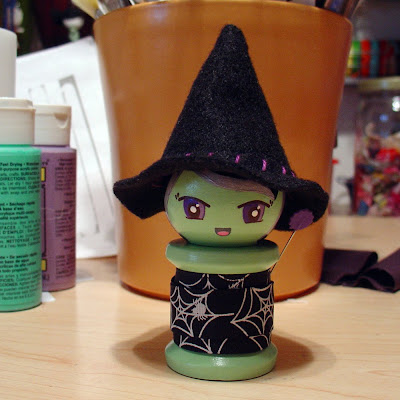
Getting pretty good at making these. I made Morgan in a few hours last night. Not that I had to but I mixed her swampy green skin. I was playing with the small bottle of paint, when it occurred to me today that if you want to reproduce an item, you have to mix a lot of paint. Of course, it also brings up the subject of mixing paint vs. buying all ready tinted paint. Using paint straight out of their bottles ensures consistency but I think it's kinda fun mixing your own. I just love her skin!!!

1.9.09
evolution.
After practicing on over a dozen squinty eyed spool dolls, I finally acquired enough skills to move on to wide eyed dolls. Although it seems trivial, the number of white reflective dots in their eyes makes a difference in capturing expression. Actually the length of eyelids also matters. This first doll looks fierce and mean with the furrowed, almost mono-brow.

Softer with eyelids trimmed and more white dots, Dahlia now radiates with glee.

Safira and Dahlia, bright and wide eyed!


Softer with eyelids trimmed and more white dots, Dahlia now radiates with glee.

Safira and Dahlia, bright and wide eyed!
14.8.09

28.7.09
Owl on a log.

Meet Carnation, the dreamy owl birdie. She enjoys red wine and sunsets and apples and cheese. She especially loves ball flowers, so she welcomes colorful pins aplenty in her log, creating a most wondrous garden for perching.
10.7.09
eureka.
bvI have not been able to stop making these apples. I kept adjusting the pattern for a curvier, tapered body but I think I've finally come up with the perfect shape. This green apple has the narrower bottom I'm looking for.

More importantly, I have more exciting news. Tonight, as I was getting ready to secure the leaf and stem to this gorgeous fruit, I saw something else. A pear!!! Yup, a pear and the pear below is actually the apple, upside down, sans puckers! It's a simpler task since it won't require the tricky thread tugging necessary for an apple's puckers. With a pear, attaching stem and leaf finishes the job. One pattern for 2 different fruits - that is brilliant! (There's a very impressive lady who sells these patterns in a kit and I bet she offers a single pattern for both fruits.) Hmmm....

I certainly look forward to making lots of pears this weekend, but for now I desperately need to do some snoring ^_-. I do hope these tutorial and tips have been encouraging. Perhaps you too will discover something new - happy crafting!
9.7.09
handpicked giveaway.

To celebrate the Summer and as a token of my appreciation for the crafts community, I'm giving away an apple pincushion of your choice from this batch. To enter, please leave a comment. The winner will be randomly picked and announced on Aug10. Enjoy!!!
Don't forget to check out the tutorial.
7.7.09
apple pincushion tutorial.
I have been wanting to make my very own brightly colored fruity pincushions for some time but haven't because I didn't have a pattern. Although there are certainly enough patterns online and in stores available for these, I prefer developing my own patterns so I don't have to worry about being bound to certain limitations. It's far more rewarding and comforting knowing I'm working with templates of my own. In the end, I control the fates of my creations - keep, gift and yes even sell them.
The pictorial tutorial shows a quick way of creating your own pattern. You can also apply this method to other bulbous articles; yes, a pear, an egg (use a styrofoam/cardboard egg please and perhaps 4 parts, instead of 6, is best), a tomato. Whatever you choose, I'm sure you'll find this exercise quite encouraging and liberating. Have fun!!!

Add an additional 1/8" seam allowance to your fabrics when cutting. For the stem, cut 2 pieces of felt in 2 colors, 1" x 1.5", with the inner felt just slightly narrower and roll them, stitch closed. The leaf also uses 2 shades of felt, the underside being darker. Sew leaf to one end of rolled stem. Secure stem and leaf with fabric glue to apple; also attach a button on apple's bottom with fabric glue. With perle cotton and doll making needle, (or the longest needle you have) go through stem, apple and button at least 3 times. Pull taut to create puckers and knot.

19.6.09
basket cake.


12.5.09

Subscribe to:
Posts (Atom)


